Start and Stop Azure VMs Using PowerApps, Power Automate(formerly known as Microsoft Flow), SharePoint and Azure Automation - Part 2
Continuing from
my previous post, in this one I’ll go through the other two steps of Power Automate(formerly known as Microsoft Flow) and Power Apps.
These are some of the key features of the Power App that I’ve added which brings everything together:
The Set function is used hold assigns the result from the Start or Stop call to the Flow
Lastly, the Notify function is displays the VM state after the Start/Stop VM called.
Power Automate(formerly known as Microsoft Flow)
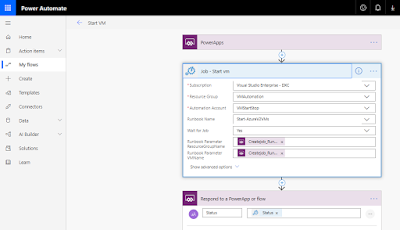
This is a simple three-step workflow. I am using the Azure Automation connector to call the Azure Automation runbooks to start and stop the VMs.- The Power App initiates the call
- Is an Azure Automation connector and the action is Create Job
- Then the status is returned to the Power App. The status is the VM power state which is either “running” or “stopped”
Power App
Creating the Power App is as simple you can learn more about Power Apps here. I made use of the Create an app feature on the SharePoint which basically created the app for me and I’ve made a couple of tweaks to make it work for me.These are some of the key features of the Power App that I’ve added which brings everything together:
- Dropdown which filters the list by Product. I have different environments which I wish to control. I’ve using the Distinct function on the OnSelect action of the control to filter my list SharePoint.
The Set function is used hold assigns the result from the Start or Stop call to the Flow
Lastly, the Notify function is displays the VM state after the Start/Stop VM called.
- Start button –
- StartVM.Run('Resource group_DataCard1'.Default, VM_DataCard1.Default)
- Notify(PowerState.status)
- Stop button -
- StopVM.Run('Resource group_DataCard1'.Default, VM_DataCard1.Default)
- Notify(PowerState.status)


Comments
Post a Comment